Pages

Sunday, November 20, 2016

Grandma's Banana Nut Cake

Every holiday at my grandmother's house, you would find this cake on the counter.  So good, so full of memories!  I shared my egg-free adaptation of my Grandmother's recipe for Banana Cake (EF, DF) in May, with the ever popular pairing of cream cheese frosting.  Here is the same recipe with pecans and my Grandmother's amazing banana nut icing.  I have never seen this kind of icing outside of my family gatherings.  The icing is kind of like a banana nut syrup.  Because it is made with fresh bananas, it does darken the longer it sits out.  Although, the longer it sets, the more the icing soaks in to the cake.  Yum!  Regardless, this cake won't last long.


Grandma's Banana Nut Cake

6 medium mashed bananas
½ c vegetable oil
½ c milk 
2 t vanilla extract
3 c flour
2 c sugar
2 t baking powder
2 t baking soda
1 t salt
2 T white vinegar
½ c chopped pecans

Preheat oven to 350o.  Cut out wax paper into a circle that fits the bottom of two round cake pans.  Place wax paper in the bottom of the pan then grease with shortening on top of the paper and up the sides.  Set aside.  

Mix cake in a bowl or with a stand mixer.  Blend the bananas until smooth.  Add oil, milk and vanilla mixing until combined.  Slowing add in the dry ingredients, while mixing the batter.  Lightly dust the pecans with flour, about 1 teaspoon and mix into batter.  Once batter is smooth, then mix in vinegar.  The vinegar reacts with the baking soda to help the cake rise, so you don’t want to put it in too early. 

Pour batter evenly in the two prepared pans immediately and bake for about 30-35 minutes or until toothpick comes out clean.  Cool cake in pans on wire rack for about 20-30 minutes.  Invert onto wire rack, carefully peel off wax paper and cool completely.  When cooled, frost with banana nut icing.

Grandma's Banana Nut Icing

1 c sugar

¾ c milk
2 bananas, mashed
3/4 c nuts

In a sauce pan, mix sugar and milk.  Cook on medium heat until thickens.  Add banana and nuts.  Stir.  Cool slightly before topping the cake.


Friday, October 21, 2016

Fall

I made a quick updated to my new and very popular Best Chocolate Chip Cookies (EF) recipe.  I liked it a little better when I used salted butter and omitted the added salt.  I still left a note at the bottom, if you use unsalted butter to add 1/2 t of salt.

In honor of this lovely fall season, I am sharing some of my favorite fall recipes...


Friday, September 9, 2016

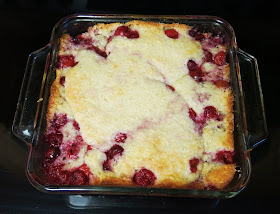
Quick Cherry Cobbler

In July, I ordered ten pounds of cherries from a local farm and made this delicious cobbler.  This recipe is an old recipe my Mom had and I am not sure she knows where she got it.  But it is similar to many other cake-like old fashion cobbler recipes.  I still have some cherries in the freezer.  I hope to experiment with them soon!


Quick Cherry Cobbler

1/3 c butter or margarine
¾ c sugar
1 c flour
2 tsp baking powder
¼ t salt
¾ c milk
½ t almond extract
2 c red cherries, pitted
¼ c additional sugar

Preheat oven to 325o.  Melt the butter or margarine in a 9x9 baking dish.  In a mixing bowl, combine the ¾ c sugar, flour, baking powder, salt and milk.  Pour over melted butter or margarine but do not stir.  Add almond extract to cherries and pour cherries over batter.  (You can substitute vanilla extract for the almond extract but the almond is recommended.)  Again, do not mix.  Sprinkle ¼ c sugar over cherries.  Bake for about 45 minutes.  The batter will rise and the cherries will settle to the bottom.  Serve warm topped with vanilla ice cream!
Serves 8


Monday, August 29, 2016

Roasted Sausage and Summer Vegetables

I love fresh summer vegetables.  I don't grow them myself, but my local grocery store does a good job of stocking locally grown produce this time of year.  I always try to be sure to incorporate some into my menu.  I especially love the summer zucchini and squash.  There are several recipes similar to this one floating around.  I made this one similar to how I like to roast my vegetables in my other recipes.  It turned out really well.  I debated on how much oil to use.  This time I used 1/cup.  I think I may try reducing that to ¼ cup the next time I make it.  That may depend on your own taste.  This recipe is a good, quick recipe that we all need during the busy back to school season!


Roasted Sausage and Summer Vegetables

2 13 oz packages of turkey kielbasa, sliced*
2 medium zucchini, quartered and sliced
2 medium yellow squash, quartered and sliced
1 sweet onion, cubed
1 orange bell pepper, cubed
6 cloves of garlic, minced
2 t seasoned salt*
1 t pepper
1 t Italian blend seasoning
¼ - 1/3 c extra virgin olive oil

Preheat oven to 425o.  After slicing and chopping, place sausage and vegetables in a large bowl.  Sprinkle with garlic and spices.  Drizzle with oil.  With a large spoon, gently mix until oil and spices are evenly coated.  Line two large rimmed baking sheets with parchment paper.  Spread sausage and vegetable mixture evenly on pans.  Place both pans in preheated oven.  (The pans can be placed on two different oven racks.)  Bake for about 30-45 minutes.  While cooking, stirring once or twice and rotate pans to roast evenly.  Serve with your favorite couscous*, quinoa or rice.

*These items could contain gluten.  If you have a gluten allergy, check the labels carefully or use a safe substitute.  


Friday, August 19, 2016

Best Chocolate Chip Cookies

I posted a chocolate chip cookie recipe several years ago.  They were good, especially warm, but would harden once completely cooled.  So, I was always looking for a way to adjust them to improve the texture.  I finally figured it out!  One of my kid's teachers apparently makes better chocolate chip cookies than Mommy.  I found out that she puts pudding mix in the batter.  So, I adjusted my recipe to include some.  Ahhhh... cookie perfection!!  So good!  


Best Chocolate Chip Cookies

½ c butter (salted) 
½ c vegetable shortening
¼ c sugar
¾ c brown sugar
1 small package instant vanilla pudding
1 t vanilla
2 t baking powder
1 t baking soda
2½ c flour
1/3 c milk
1½ c semi-sweet chocolate chips


Preheat oven to 375o Cream together the butter, shortening, both sugars, pudding mix and vanilla.  Add the baking powder, baking soda and salt mixing constantly.  Slowly mix in the flour.  Add milk one tablespoon at a time until dough starts to stick together.  Stir in chocolate chips.  Roll into balls and place two inches apart on a cookie sheet.  Bake for about 10 minutes.  Let cool for 2 minutes on cookie sheet before removing.  Makes about 3 dozen cookies.

Note:  If you use unsalted butter, add ½ t salt.

Friday, July 15, 2016

Peach Crisp

Ahhh... summer fruit is so lovely.  I bought a large box of peaches.  We had peaches with every meal for days.  Thankfully, I had some help peeling and slicing them.  I made a peach crisp and a peach cobbler.  I also saved enough to make one more crisp and another cobbler.  This is the crisp recipe here.  I will post the cobbler recipe soon.  Enjoy!


Peach Pecan Crisp - Click here to link to recipe.  This recipe has pecans but I think it would be just as good without.


Saturday, July 9, 2016

Perfect Pie Crust

For Father's Day, my husband requested a blueberry pie.  I used fresh blueberries and it was really good.  Ah... I love summertime when fresh produce is abundant!  I may still make a few more adjustments to the pie filling so I am not posting that just yet.  But you do need to try this crust!  It is so good!!  It is the flakiest crust I have ever made!  Yum!


Perfect Pie Crust << Click to link to the recipe.
ALLERGY NOTE:  I mostly made this crust as described in the recipe but I DID NOT brush this crust with beaten egg!  I brushed it with milk and sprinkled with granulated sugar.  As you can see it turned out a lovely golden color.


Thursday, June 16, 2016

Club Soda Cake

I have all kinds of egg-free cake recipes.  But sometimes my kids just want a funfetti cake from a box like every other kid.  I have made these Pillsbury Cupcakes (EF) for a while but they are still pretty crumbly, so I know the recipe couldn't be made into a cake.  In researching for a better option for a cake using a mix, I found several recipes that use various kinds of soda with the mix.  Because the cake mix is already plenty sweet, I decided club soda would be the best option.  Plus, you aren't adding any fat or calories to the mix.  That is also a plus.  The cake worked out really well.   I have now made it in a sheet pan and layered. 


Club Soda Cake
1 box cake mix
Club soda

Mix cake mix and enough club soda to replace only the liquid in the recipe.  Do not include the eggs in your liquid amount.  For example, I used a Pillsbury Funfetti cake mix.  The box says to mix in 1 cup water, ½ cup oil and 3 eggs.  For this recipe I only mixed in 1½ cups of club soda or 12 ounces.  Pour cake mix into a greased cake pan and bake according to package directions.  I am pretty sure I took the cake out a little early.  Set your timer to check on it a few times and use a toothpick to make sure it is cooked through.

To make a layer cake:
Before mixing up the batter, cut out wax paper into a circle that fits the bottom of two round cake pans.  Place wax paper in the bottom of the pan then grease with shortening on top of the paper and up the sides.  Set aside.  
Pour batter evenly in the two prepared pans immediately and use box for approximate cook times or until toothpick comes out clean.  Cool cake in pans on wire rack for about 20-30 minutes.  Invert onto wire rack, carefully peel off wax paper and cool completely.  When cooled, frost with your favorite icing.

 The topping of this cake is the same sugar paper they use at most commercial bakeries.  
I asked them if I could buy one and they gave it to me!  So generous!!

Sunday, June 5, 2016

Peanut Butter Blossom Cookies {Egg-free}

I have been making these cookies for years.  I originally posted them in January of 2012 as a variation with my Peanut Butter Cookies (EF, DF) recipe.  I decided to move them to a post of their own since most chocolate kisses contain dairy and the peanut butter cookie alone does not.  


My family loves these.  It is also a great recipe to make for non-allergy friends.  They certainly won't miss the egg in this one!  Enjoy!!


Peanut Butter Blossom Cookies

¼ c vegetable shortening
1 c creamy peanut butter
1/3 c granulated sugar
1/3 c packed brown sugar
1 t vanilla
¼ c milk 
1 t baking powder
1 t baking soda
1/4 t salt
1 1/2 c flour
2-4 T additional milk 
3-4 T additional sugar
1 bag of chocolate kisses

Preheat oven to 375°.  In a large bowl, beat shortening, peanut butter and sugars until light and fluffy.  Add milk, vanilla, baking powder, baking soda and salt; beat well.  Gradually add flour, beating until mixed in.  Add additional milk one tablespoon at a time until dough starts to form.  Shape into 1 inch balls.  Roll in additional granulated sugar; place on ungreased cookie sheet.  Bake 8-10 minutes or until lightly browned.  As you remove from the oven, gently press one unwrapped chocolate kiss into the middle of cookie.  Cool slightly on cookie sheet before removing.
Makes about 2-3 dozen cookies.

Sunday, May 29, 2016

Quick and Easy Paella

This recipe is from my sister-in-law.  I can't really take any credit for it.  Her mom used to make something similar when she was growing up.  Paella isn't typically kid-friendly fare.  But this simpler quick version is a little more kid-friendly.

I usually make this with one package of the frozen seafood blend (shrimp, scallops and calamari) at Trader Joe's.  It is such a good deal!  One of my kids in particular doesn't like the calamari in the mix but loves shrimp.  Next time I make it, I may make it with just shrimp to make for a happier meal time.  ;)


For the rice, I like Vigo Saffron Yellow Rice.  According to several sources it is gluten-free.  But if you are particularly sensitive, please verify.


Quick and Easy Paella

1 package yellow saffron rice
1 lb seafood mix (thawed if previously frozen)
1/2 T olive oil
1/2 T butter
salt and pepper, to taste
frozen peas

Thaw the seafood prior to beginning, if previously frozen.  Cook rice according to package directions.  Also, cook peas according to package directions.  Be careful to not overcook or they will be mushy.  While rice is cooking, heat oil and butter in a skillet.  Add seafood and saute until cooked through, season with salt and pepper.  Sometimes excess moisture will cook out of the seafood from being frozen, spoon out while cooking so the seafood maintains a nice texture.  To serve spoon rice onto a plate, top with seafood and sprinkle with peas.


Sunday, May 8, 2016

Banana Cake {Egg-free, Dairy-free}

So, April came and went...  We had a crazy busy month.  That was the first month I haven't posted since I started this blog over four years ago.  But the recipe I am posting today is worth the wait!

I saw a recipe on Pinterest for banana cake that I thought was going to be egg-free.  But when I opened the link, it had eggs.  Boo!  But my mouth was already watering for banana cake.  What is a gal suppose to do?
I thought about it for a few days and decided to create my own recipe.  What do you know, it turned out great!  I even made a two layer cake!

The cake recipe can easily be made dairy-free.  I frosted mine with Cream Cheese Frosting (EF, GF)  and topped it with toasted pecans.  If you are allergic to dairy, use your favorite dairy-free frosting or you could simply sprinkle with powdered sugar.  And of course the pecans would be optional, too.  Enjoy!

If you like this recipe, you  must also try my most popular recipe for Banana Muffins (EF, DF).  


Banana Cake

6 medium mashed bananas
½ c vegetable oil
½ c milk or non-dairy milk
2 t vanilla extract
3 c flour
2 c sugar
2 t baking powder
2 t baking soda
1 t salt
2 T white vinegar

Preheat oven to 350o.  Cut out wax paper into a circle that fits the bottom of two round cake pans.  Place wax paper in the bottom of the pan then grease with shortening on top of the paper and up the sides.  Set aside.  

Mix cake in a bowl or with a stand mixer.  Blend the bananas until smooth.  Add oil, milk and vanilla mixing until combined.  Slowing add in the dry ingredients, while mixing the batter.  Once batter is smooth, then mix in vinegar.  The vinegar reacts with the baking soda to help the cake rise, so you don’t want to put it in too early. 

Pour batter evenly in the two prepared pans immediately and bake for about 30-35 minutes or until toothpick comes out clean.  Cool cake in pans on wire rack for about 20-30 minutes.  Invert onto wire rack, carefully peel off wax paper and cool completely.  When cooled, frost with your favorite icing.

Note:  I have not yet tried this cake in a 9x13 cake pan.  When and if I do, I will update the cook time here.  If you try it first, let me know how it turned out!  Thanks!

Wednesday, March 30, 2016

Honey Oatmeal Bread

I found this recipe a while back and finally made it Easter weekend.  It is SO good!  We loved it and it was gone in less than 24 hours.  Baking this bread also makes your house smell wonderful!!

I like to think it is pretty healthy too.  It has some whole wheat flour and whole grain oat.  But it has enough all-purpose flour in it to keep even the pickiest palate interested.  I also like that it has honey instead of sugar.  This recipe does have a little bit of butter.  I think it could easily be made dairy-free with a non-dairy margarine.


Honey Oatmeal Bread << Click here to link to recipe.

Sunday, March 27, 2016

Lemon Cream Pie {Egg-free} UPDATE

The last few times I have made this pie, my filling was kind of grainy.  I made it again for Easter weekend and decided to make some changes.  Ah... so much better!  It is lemony, smooth and delicious.  I am updating my original recipe here.

If you are familiar with my original recipe, I reduced the sugar in the crust because it would get kind of sticky and would stick to the pie plate.  I also took out the added sugar in the filling because the sweetened condensed milk has plenty!  I also doubled the lemon zest and adjusted the cooking instructions to make sure you don't curdle the milk during cooking.  I figured out that was my biggest problem with the filling.

Happy Easter everyone!!

Lemon Cream Pie (EF)  <<Click to link to recipe.

Thursday, March 17, 2016

Southwest Barbecue Chicken

We have been trying to grill most weekend, even during the winter months.  It has been wonderful!  I love grilled food and it makes excellent leftovers!  Mmmmm.

This recipe came out of my husband's favorite grilling book.  I think a friend recommended it to him.  If you are looking for a good one, check it the link below.  The recipe below is one-third of the the one in the book.  We adjusted it for the amount of chicken we were cooking so we wouldn't have to store the leftover spice mix that would likely get lost in the cabinet.  We also added some more specific instructions.

 Try the grilled chicken cut up with some southwest tossed salad!

Southwest Barbecue Chicken
Recipe credit:  Wild Willy's Number One-derful Rub 

¼ c paprika
2 T black pepper
1T salt
1T sugar
2 t chili powder
2 t garlic
2 t onion
1 t cayenne (optional)
½ c vegetable oil

Mix vegetable oil and spices in a resealable plastic bag.  Place chicken into the bag.  Knead bag to coat chicken with marinade. Squeeze out air, seal bag, and refrigerate at least 4 hours up to overnight.  Remove chicken from marinade.  Grill chicken on preheated grill until browned, the juices run clear, and an instant-read meat thermometer inserted into the thickest piece reads at least 160 degrees F (70 degrees C).

We have a kamado style smoker and convection grill.  These aren’t extremely common.  But if you do have one, this is how we cooked it.  Set the dome temperature to 370 oF.  Cook on each side for about 10-12 minutes per side or until the internal temperature of the chicken is more than 160 oF. 

Saturday, March 5, 2016

Blackened Tilapia

I am so glad my kids will eat fish.  It cooks up pretty quick and is a great source of lean protein.  I looked up several recipes for blackened tilapia.  Blackened Tilapia on the blog Like Mother Like Daughter is the recipe I got the most inspiration from.  Enjoy!


Blackened Tilapia
Inspired by:  Blackened Tilapia on the blog Like Mother Like Daughter

2 T chili powder
2 T paprika
2 t black pepper
1 t onion powder
1 t garlic powder
1 t dried oregano
1 t dried thyme
1-2 t brown sugar
1 t salt
1 t cayenne (optional)
2 pounds of tilapia
olive oil to grease your skillet

Mix all the spices in a rimmed plate.  I like to use a glass pie plate.  Rinse and pat dry your thawed tilapia.  Press one side of the tilapia onto the spice mixture.  Turn over and press again until both sides have a thin coating of spice.  For best results, cover with plastic wrap and put into your fridge about a hour.  I have skipped this step and the fish still cooks up great.  Preheat 1 to 2 TBSP olive oil at a time in a large frying pan on medium high heat.  Place your tilapia in pan and fry 3-4 minutes on each side, or until fish is cooked throughout and flakes easily with a fork.


Thursday, February 25, 2016

Pizza Rolls

These are so easy, freeze well and are a great lunchbox option!  Enjoy!


Pizza Rolls - click to link to recipe
You can even use the Pillsbury roll out pizza dough for a quick fix.  

Wednesday, February 10, 2016

Grilled Chicken Fajitas

We haven't let the cooler temperatures stop us from grilling this year.  My husband has made these fajitas a couple of times this month because they were such a big hit.  Plus, he was adjusting this recipe and wanted to make a few changes. We put our chicken on warm tortillas and topped them with sauteed onions and shredded cheese.  If you are are on a gluten-free diet, try corn tortillas.  Yum!


Grilled Chicken Fajitas

½ c vegetable oil
¼ c lime juice
2 T honey
2 T chili powder
2 T garlic powder
1 T ground black pepper
1 t salt
½ t paprika
3 pounds skinless, boneless chicken breasts, cut into strips

Mix vegetable oil, lime juice, honey and spices in a resealable plastic bag.  Place chicken strips into the bag.  Knead bag to coat chicken with marinade. Squeeze out air, seal bag, and refrigerate at least 4 hours up to overnight.  Remove chicken strips from marinade; discard remaining marinade.  Grill chicken on preheated grill until browned, the juices run clear, and an instant-read meat thermometer inserted into the thickest piece reads at least 160 degrees F (70 degrees C).


We have a komodo style smoker and convection grill.  These aren’t extremely common.  But if you do have one, set the dome temperature to 370 oF.  Cook on each side for about 5 minutes per side (assuming you precut the chicken into strips) or until the internal temperature of the chicken is more than 160 oF. 

Friday, February 5, 2016

Chocolate Crinkle Cookies

Do you need a delicious chocolaty treat for your sweetie this Valentine's Day?  Try these chocolate crinkle cookies.  They are SO good!

The original recipe is actually vegan (see link below).  I changed them slightly to avoid using flax.  I don't have anything against flax, I just try to make sure the recipes on this blog are made with ingredients everyone typically has in their kitchen.  I hope to be a resource for families with food allergies.  But I also want to post easy to make recipes that can help out friends that are trying to accommodate others with food allergies but don't typically cook allergy-free.


Chocolate Crinkle Cookies

¾ c sugar
¹⁄3 c canola oil
2 T dark corn syrup
1 t pure vanilla
¹⁄3 c milk
½ c chocolate chips, melted
1½ c all-purpose flour
2 T cocoa powder
2 t baking powder
¼ t salt
1 c powdered sugar
¼ c granulated sugar

Preheat the oven to 325°.  Melt the chocolate chips in microwave safe bowl in 30-second intervals, stirring in between each until chocolate is smooth.  In a large bowl, mix together sugar, oil, dark corn syrup, vanilla, milk, and melted chocolate. Mix until smooth.  Sift in flour, cocoa powder, baking powder, and salt. Stir until fully incorporated.  Refrigerate dough for 20 minutes before rolling.  Scoop a tablespoon of dough for each cookie and roll with your hands into a ball.  Roll each cookie first in granulated sugar, then in powdered sugar.  The more powdered sugar now, the prettier the cookie when it comes out of the oven.  Place cookies about 2 inches apart on baking sheets lined with parchment paper. Bake for about 14 minutes. After baking, let cookies cool on baking sheet for at least 5 minutes before transferring to a cooling rack. 


Friday, January 22, 2016

Kielbasa and White Bean Stew {Slow-cooker}

For lunch, I all too often end up eating some of the quick kid favorites I keep on hand for lunches at school and home.  I decided I needed some quick, healthier options for myself.  I was on the look out for some kind of soup that would freeze well.  I found this one on Pinterest.  It is easy to prepare.  You just toss it all in the slow-cooker with very little prep work.  Then I split it up into individual freezer containers.  It thaws well in the microwave and is quite filling.  This is a great lunch for a cold winter day.  This recipe is a keeper!

Notes:  I made this with turkey sausage, as suggested.  For dairy-free, omit Parmesan cheese.  For gluten-free, make sure your sausage and chicken broth are gluten-free.


Saturday, January 16, 2016

Bolognese Sauce {Slow-cooker}

This is delicious!  It is perfect for a cool January day.  This recipe as a little more prep work than most of my other slow-cooker recipes.  So, I did all of the prep at night and let it cook all night.  The next morning, I put it in the fridge.  At dinner time, I cooked up some pasta and just reheated the sauce at dinner time.  So good!


Slow-Cooked Bolognese Sauce - Click to link to recipe.

Gluten-free notes:  Make sure the tomato paste you use is gluten-free.

Friday, January 8, 2016

Chewy Chocolate Chip Granola Bars

I have been making these granola bars for my kid's lunches.  I make them into a 9x13 pan, cut them into about 24 bars, put them into individual baggies and put them in the freezer.  I always pack lunches the night before.  The frozen granola bar is thawed in plenty of time for lunch.  They actually thaw in about 10 minutes.  Sometimes, I put some out before I run out to pick up the kids and they are thawed in time for lunch.  My kids love these granola bars.  I think they have less sugar and far less additives than the grocery store varieties.  Enjoy!!


Chewy Chocolate Chip Granola Bars

4 c old fashioned oats* 
½ c unsalted butter
1/2 c brown sugar, packed
2/3 c honey
1 t vanilla* 
4 cups puffed rice cereal* 
1/2 c mini chocolate chips

Preheat the oven to 350o.  Spread out the old fashioned oats on a baking sheet.  Toast the oats in the preheated oven for 3-5 minutes, or until fragrant to enhance the flavor. 
Line a 9x13 pan with parchment paper or spray with cooking spray.  Using the parchment paper will make them easier to remove and cut into bars later. 

In a sauce pan, melt butter, brown sugar, and honey over medium heat, stirring until the sugar is dissolved.  Bring to a slight simmer for a 1-2 minutes.   Remove from heat, cooling slightly.  Then mix in vanilla.  In a large bowl, combine the toasted oats and puffed rice cereal.  Pour the slightly cooled honey mixture over the oat mixture, stirring to coat.

Pour the mixture into the prepared pan, pressing firmly.  Sprinkle with chocolate chips and press into granola slightly.  Chill for about one hour prior to cutting.  Put each cut granola bars into individual small baggies.  Put the individual bags into a large freezer bag and freeze until ready to use.  Set out for about 10 minutes before eating. 

*Gluten-free notes:
– Oats are often processed on the same equipment as wheat and other gluten.  You can buy certified gluten-free oats. 
– Vanilla can contain gluten.  I use McCormick pure vanilla extract.
– Rice Krispie has a gluten-free option, as do some other brands.